No Results Found.
The page you requested could not be found. Try refining your search, or use the navigation above to locate the post.
About me
Projects
Workshops
Blog
The page you requested could not be found. Try refining your search, or use the navigation above to locate the post.
Images
$variable({u0022typeu0022:u0022contentu0022,u0022valueu0022:{u0022nameu0022:u0022loop_menu_textu0022,u0022settingsu0022:{u0022beforeu0022:u0022u0022,u0022afteru0022:u0022u0022,u0022loop_positionu0022:u0022u0022}}})$
$variable({u0022typeu0022:u0022contentu0022,u0022valueu0022:{u0022nameu0022:u0022loop_menu_descriptionu0022,u0022settingsu0022:{u0022beforeu0022:u0022u0022,u0022afteru0022:u0022u0022,u0022loop_positionu0022:u0022u0022}}})$
Contact us
- 12. January 2026
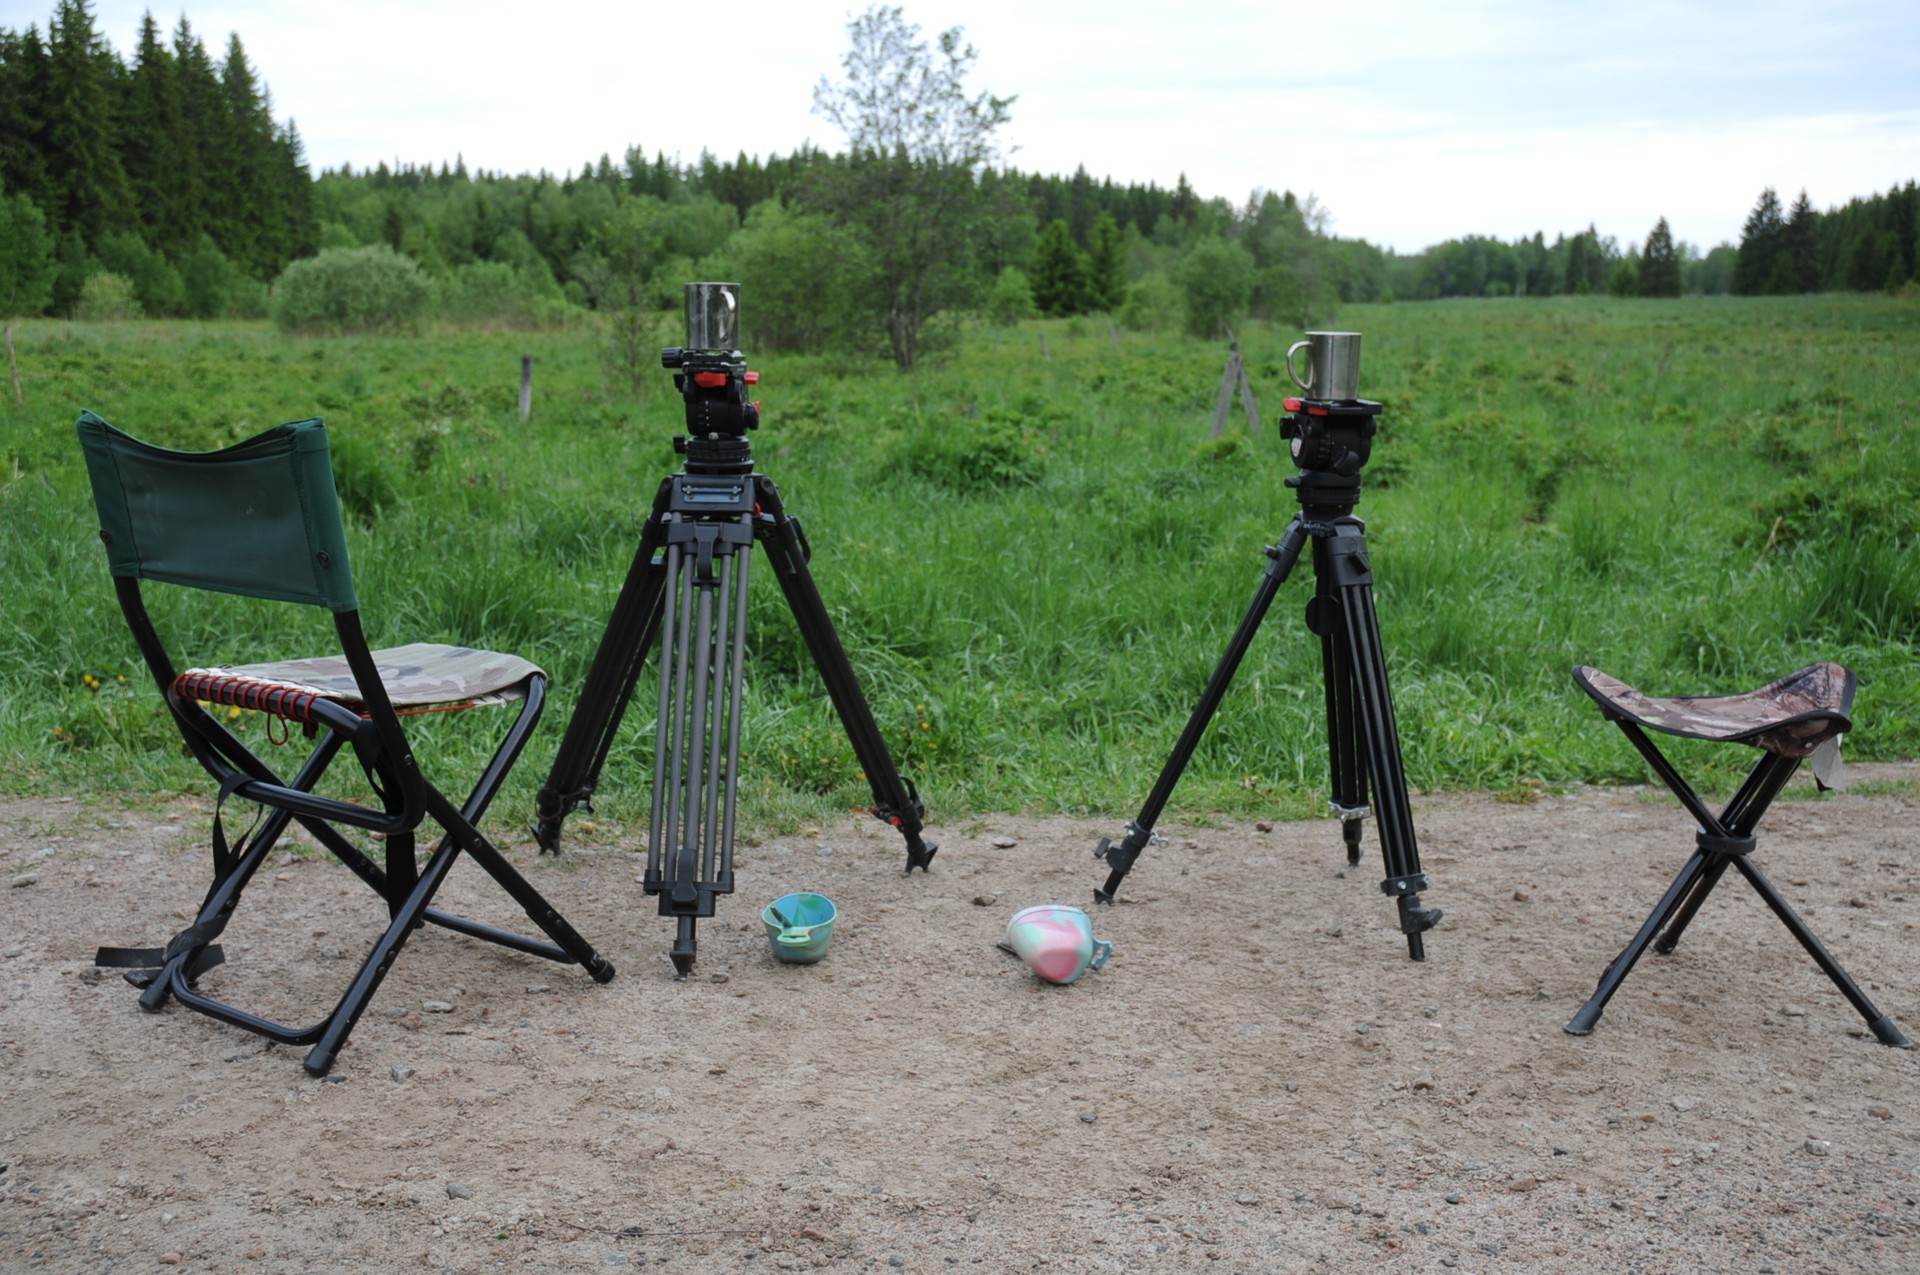
With long focal lengths, “sharpness” is not the problem; it is the tiny movement that prevents sharpness. The longer the focal length, the higher the sensor resolution, and the smaller the time window for correct technique, the less forgiving the system becomes. In practice, it is therefore not about the one perfect, razor-sharp image, but about yield: How many images in a sequence are truly usable, how reproducible is the result, and how quickly are you ready when the subject appears only briefly?

Julius Kramer
Wildlife Photographer & Conservationist
With long focal lengths, “sharpness” is not the problem; it is the tiny movement that prevents sharpness. The longer the focal length, the higher the sensor resolution, and the smaller the time window for correct technique, the less forgiving the system becomes. In practice, it is therefore not about the one perfect, razor-sharp image, but about yield: How many images in a sequence are truly usable, how reproducible is the result, and how quickly are you ready when the subject appears only briefly?
Stabilization is more than a simple “tripod yes/no”. It is an interplay of support, body posture, damping, operation, and speed. Beanbag, monopod, and tripod solve the same problem in different ways. And depending on whether you are sitting in the car, waiting in a hide, stalking along a stream, or tracking birds in flight, the best solution can change very quickly.
Many people think of stability as visible camera shake. In practice, it is micro-movements: a minimal change in pressure in your hand, a muscle that starts trembling after five minutes, a gust of wind that sets the setup vibrating, a wooden floor that resonates, or your own breathing, which suddenly feels like an earthquake wave at long focal lengths.
On top of that: Modern cameras have very effective stabilization systems (IBIS, VR/OS/IS), but they work best against specific movement patterns. They do not replace solid support. In-camera stabilization can compensate for small angular movements; it cannot prevent you from losing your composition, the subject slipping out of the AF area, or your setup springing back after every pan.
That is why “stable” in the field is a combination of three things:
First, pure image stability (how steady the image is), second, tracking (how well you can follow the subject), and third, fatigue (how long you can maintain this performance consistently). The hit rate results from all three factors.
A beanbag is a passive damping solution. It absorbs vibrations, conforms to the surface, and turns a hard edge into a steady support. However, it needs a platform: a window frame, parapet, car door, low wall, hide opening, or a raised hide rest. Without a support surface, it is hardly useful.
A monopod is mobile relief. It takes weight off your arm and primarily reduces vertical movement. It remains “lively” enough to pan quickly, but it is never as stable laterally as a tripod and it does not stand on its own.
A tripod provides maximum structure. With the right head (especially a gimbal), it can be very stable while still remaining mobile. The trade-off is weight, setup time, and bulky handling. In some situations you gain quality — in others you lose images because you are too slow or not flexible enough.
In a car, the beanbag is often the most effective stabilization option of all. It turns a car door or window frame into a stable, vibration-damped base. In a hide or observation hut, it can work similarly well on a solid edge. On raised hides, it does not replace the overall structure, but it dramatically improves the support because it reduces oscillations and softens hard edges.
A good beanbag is neither too soft nor too hard. Too soft means the lens sinks in, bounces after movements, and you constantly have to fight the bag’s shape. Too hard means it does not dampen and does not conform cleanly. In practice, a medium fill works best, allowing you to press the lens lightly into position without it tipping away.
The support surface is crucial: not just “on top”, but in a way that the bag also guides the system laterally. Many people use a beanbag that is too small or too round; as a result, lateral stability remains poor. Another lever is “preload”: a light, constant pressure downward or forward ensures the setup does not rattle, but rests under defined tension. This significantly reduces micro-movements.
The big advantage is damping. Beanbag means: less vibration, less trembling, less rebound. This makes it extremely effective, especially with high-resolution cameras and heavy telephoto combinations. It is fast: place it, align, done. It is also discreet and quiet. In sensitive situations, that can matter.
The trade-off is mobility. For birds in flight or animals that change direction quickly, you reach the limits. Panning is possible, but it is not as free as with a gimbal, and as soon as the support is unfavorable (too narrow, too high, wrong angle), it becomes jerky. Without a stable platform, a beanbag is simply not a system.
The monopod is the classic solution for mobility. If you move a lot, change position frequently, or wait for long periods while standing, it provides enormous relief. It also helps when you do not have space for a tripod or cannot find a solid support surface for a beanbag.
A monopod becomes stable through tension. Do not think of the monopod as a “support”, but as a third contact point that forms a triangle together with your body. The monopod foot is slightly in front of you, your feet are stable, and you create defined tension — either as light downward pressure or as pull, depending on your stance.
A strap technique is very effective: the camera strap is used so that it is taut when you bring the camera into shooting position. This tension reduces micro-movements and stabilizes especially when working standing up. Equally important is panning from the hips, not from the hands. Hands guide, the body carries. The less your hands have to “correct”, the steadier the image becomes.
The monopod is fast. You can set it up, roughly adjust the height, and you are immediately ready to shoot. It carries weight and makes long focal lengths more realistic over extended periods. In situations where you would otherwise shoot handheld, it can massively increase your hit rate.
Laterally, it remains sensitive. If wind comes from the side or you are standing on a vibrating surface, the monopod can even amplify problems because it transmits oscillations. With extremely long focal lengths and very slow shutter speeds, you reach the limits sooner than with a tripod or beanbag. Also: a monopod does not stand on its own. You always remain physically part of the stabilization — and that means fatigue remains a factor.
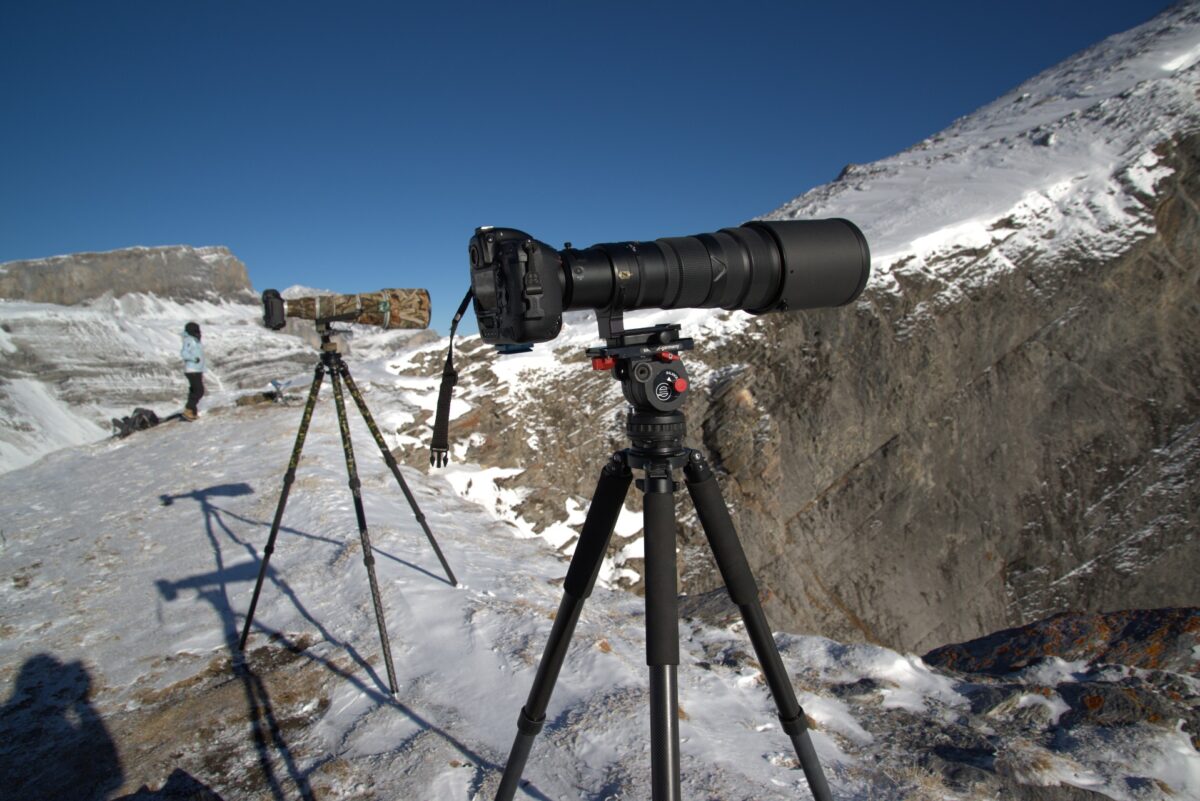
The tripod is the reference when you truly need calm: twilight, forest light, long waits, heavy telephoto lenses, video, or defined framing over long periods. It decouples you most from the camera and removes fatigue from the equation.
With long focal lengths, the head is crucial. A gimbal allows you to balance the lens so that it “floats” in any position and you only guide it rather than hold it. This is often ideal for wildlife because you are stable and can still react quickly. A ball head can work, but with heavy telephoto lenses it quickly becomes frustrating because the system “tips” as soon as you loosen it, or because you have to clamp too hard to feel safe. For video, a fluid head makes sense; for pure photography with large telephotos, the gimbal is usually the most practical solution.
Balance is not comfort; it is stability. A poorly balanced setup forces you to counteract it. Counteracting means muscles, muscles mean micro-movement. Friction should be set so that movement remains controlled but does not “stick”. Sticking leads to jerky corrections — and you see those immediately at long focal lengths.
When set up well, the tripod delivers the most consistent yield. It reduces trembling, provides relief, holds the framing, and makes the workflow more predictable. Especially in challenging light, it is often the difference between “just about works” and “clean”.
The tripod costs speed. Not necessarily in panning, but in repositioning: retract legs, carry, realign. In dense forest, on steep slopes, or with rapid position changes, this can mean missing situations. You also carry real weight — and weight determines whether you bring the system at all. A perfect tripod that stays in the car does not improve your hit rate.
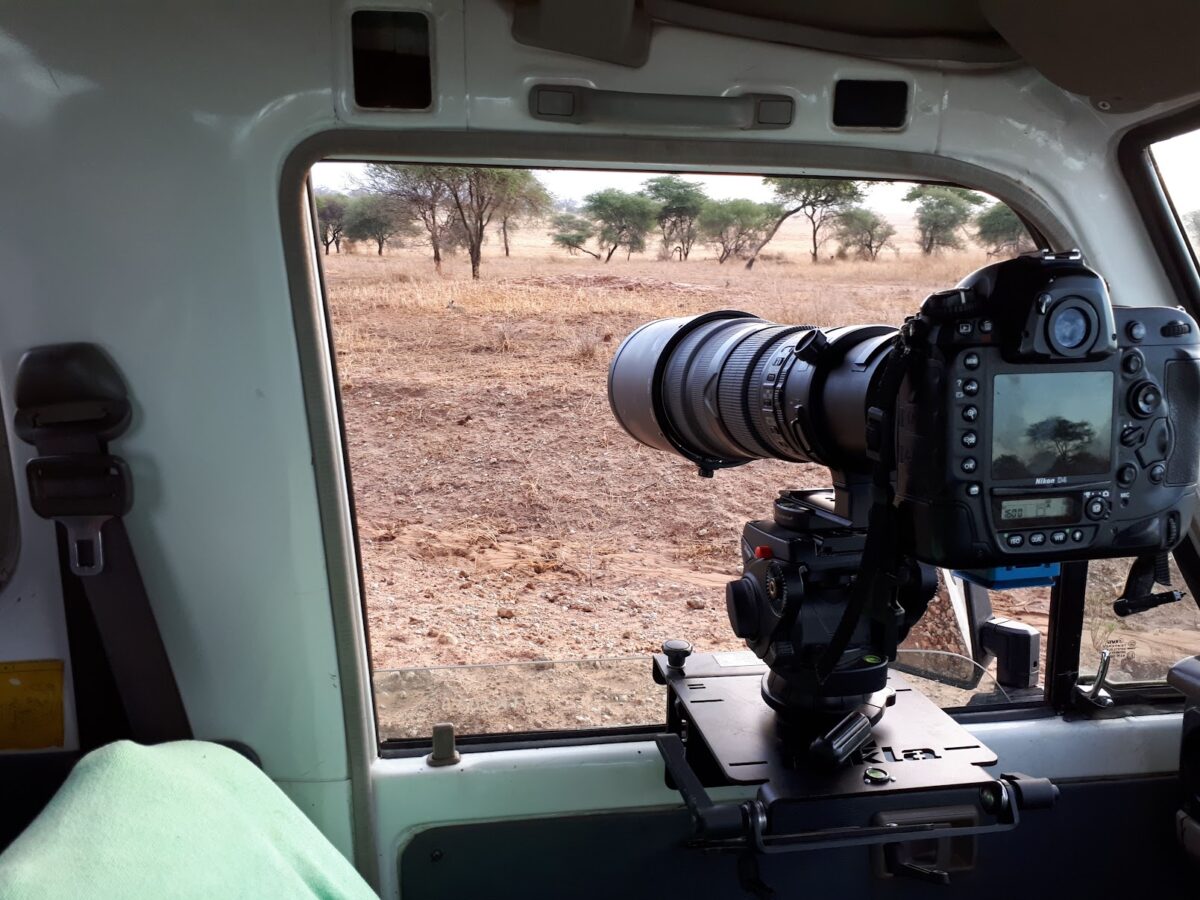
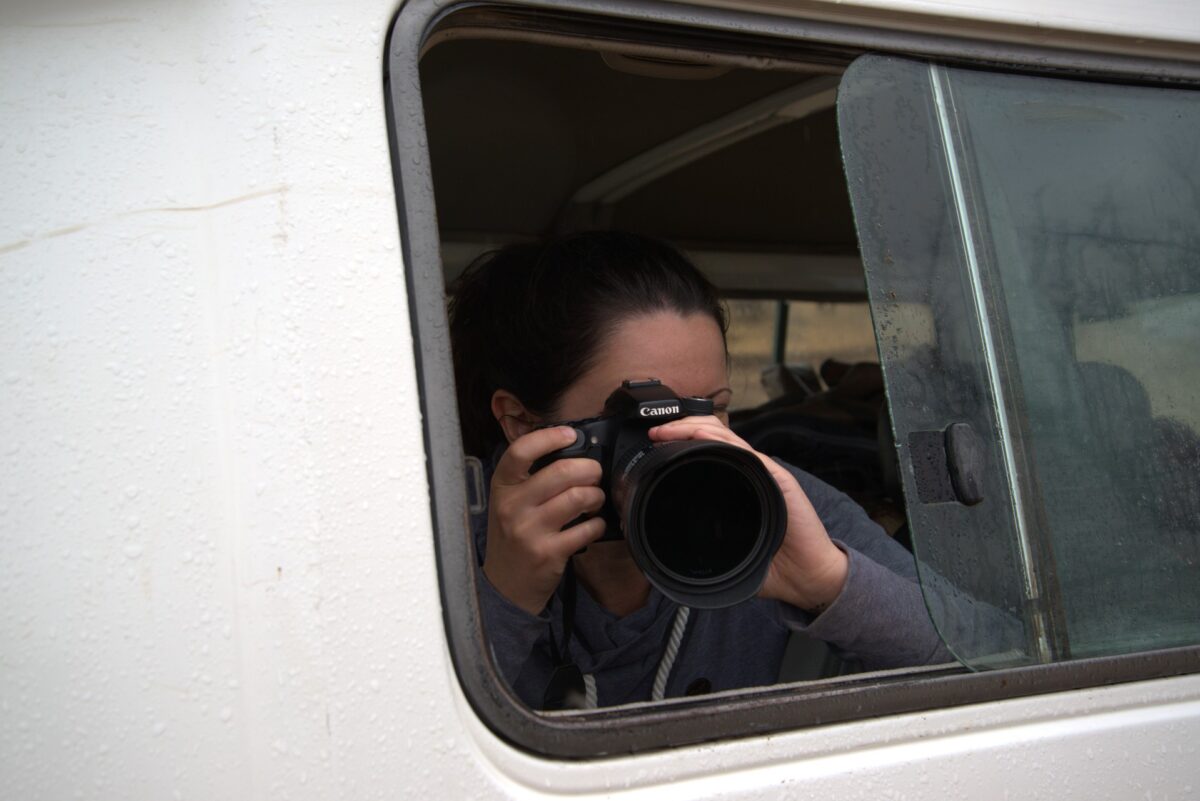
Here, the beanbag often wins. It dampens vehicle vibrations, is quiet, and fast. A tripod in the car is rarely practical; a monopod can work, but is often less stable because the car as “ground” is not ideal and you are always working against the seated position. With long focal lengths and calm subjects, the beanbag is the most efficient solution.
If you have a solid edge or parapet, the beanbag is strong again, especially for horizontal tracking. If you are photographing freely through an opening or waiting for a very long time, the tripod shows its advantages, especially at twilight. The monopod is a hybrid solution here: good if you have little space or want to react quickly, but it remains dependent on your body.
Here, mobility is key. A monopod can be the best balance because you are fast while still taking the weight. A tripod can work if you deliberately work slowly and tend to wait for situations rather than search for them. A beanbag is only relevant if you regularly find suitable supports (railings, rocks, logs) — which is not reliable.
On the ground or very low, a tripod is often at a disadvantage if it is not flexible enough or if you constantly have to reposition. A beanbag on a low rock, a sandbag spot, or an embankment can be extremely stable. A monopod is less comfortable here because the geometry becomes unfavorable; it can work, but it requires more body work.
Wind and vibrations expose every setup. A beanbag helps especially against high-frequency vibrations on a support surface. A tripod is strong when it stands stable itself and does not act as a resonator; a wide stance, minimal center column, and clean leg angles matter more than “expensive”. A monopod can be difficult on a vibrating surface because it transmits oscillations and you have little lateral compensation.
Here, tracking is what counts. The monopod is fast and allows long pans, as long as your technique is solid. A tripod with a well-adjusted gimbal can also be very good, especially if the subject stays within an area and you work balanced. The beanbag is the most limited, because quick direction changes and large height changes become jerky.
In challenging light, the weighting shifts toward stability and low fatigue. In many cases, the tripod wins because it delivers the least random variation. A beanbag can be similarly good in a hide or on a parapet if the support is perfect. The monopod remains possible, but you rely more on in-camera stabilization, clean posture, and burst shooting.
A common misconception is judging stabilization based on a single image. In the field, the sequence is what matters. A system is better when it increases your yield without slowing you down. This shows in three indicators: first, more images per sequence that are truly sharp; second, fewer “almost sharp” frames; third, better composition because you are less busy fighting shake and more focused on the image.
Another point is focusing performance. Autofocus needs a steady, controlled target. If the subject constantly slips slightly out of the area, the hit rate drops even though the AF is “actually good”. Good stabilization is therefore indirectly also AF optimization.
Many improvements cost no money — only a systematic approach.
Optimize the support: the contact point should be stable and defined. With a beanbag, that means: enough surface area, the right fill, constant pressure. With a monopod, it means: tension in the system, not just “resting it”. With a tripod, it means: a wide stance, avoid the center column as much as possible, set the head properly, balance the lens.
Balance and center of gravity: The heavier the lens, the more important balance becomes. If you are constantly fighting against tipping, you lose stability. With a gimbal, balancing is mandatory, not fine-tuning.
Use VR/IBIS sensibly: In-camera stabilization is helpful, but not equally so in every situation. With very fast pans or when panning with the subject, it can sometimes work against you, depending on the system. In practice, it pays to test the effect deliberately with your own setup: static subject, slow movement, fast movement. What matters is whether the viewfinder image settles and whether the hit rate increases.
Burst shooting and shutter technique: Especially with long focal lengths, a short burst often yields more usable images than a single shot, because micro-movements are distributed across frames. At the same time, a smooth shutter release is important. If you “jerk” at the decisive moment, you worsen stabilization regardless of the support.
Body technique: stabilization is also biomechanics. Calm breathing, controlled release, as little “fine correction” with the hands as possible, instead guiding from the body. With a monopod, this is the biggest lever of all.
Instead of giving a universal recommendation, a clear logic is worthwhile: What is your most common use case, and which system is most likely to actually be with you?
For minimal load, the monopod is often the best compromise because it provides relief and is fast. For travel by car or for hides, a beanbag is surprisingly often the most effective solution because it delivers a great deal of stability with very little complexity — provided a support surface is available. For planned hide sessions, twilight, and heavy telephoto combinations, a tripod with the right head delivers the most consistent quality.
In practice, the strongest solution is often the combination: tripod for the waiting phase and critical light, monopod for mobile sections, beanbag as the specialist for car/parapet. If you commit to just one system, you gain simplicity but lose flexibility.
If a solid support surface is reliably available (car, hide edge, parapet, raised hide rest), the beanbag often delivers the best mix of stability, damping, and speed. It is then not an “emergency solution”, but a professional tool.
If mobility and quick changes dominate (stalking, paths, changing viewing directions), the monopod is often the most pragmatic gain. It noticeably increases the hit rate without slowing you down — provided you work with tension and clean body guidance.
If light is critical, waiting times are long, or the setup is heavy (twilight, hide work, video, planned position), the tripod is the most stable and consistent solution. With a well-adjusted gimbal, it is not only “static”, but also very usable for wildlife movement.
A compact decision tree in words:
As soon as a stable support surface is available, think of the beanbag first. If there is no support and you move a lot, the path leads to the monopod. As soon as you are waiting in a planned way, using heavy glass, or working in critical light, the path leads to the tripod. For mixed use, the best yield usually comes from combination rather than dogma.
This turns stabilization from a matter of belief into a clean field decision: Which solution increases your yield today, in this situation — without making you slower.


Experiences
No phone ringing. No jeep traffic jams. No Instagram Reels. In India’s tiger reserves, rules are in place to protect the forest –
not to entertain tourists. An experience report from Kanha National Park on sustainable nature tourism, strict safari rules, and why Africa could learn from it.
Read more

Experiences
In Bavaria, at least 14 lynx disappeared under unexplained circumstances. Wildlife crime is not a distant problem—it happens in our forests. About poisoned baits, failing law enforcement, and the power of a single image.
Read more

Blog
A male lynx roams his territory near Großer Arber in the November twilight—and wins the “The World of Mammals” category at Glanzlichter der Naturfotografie 2026. The story behind the image.
Read more

Experiences
Hand on heart: who voluntarily lies flat in the forest mud during the day at three degrees and drizzling rain? While the world waits for the first cherry blossoms for the perfect Instagram selfie, I prefer to lie where it is brown, damp, and—well—quite uncomfortable. But right here, under the moldy leaves and in the inconspicuous ponds, the most exciting drama of early spring is currently unfolding.
Read more

Equipment
With long focal lengths, “sharpness” is not the problem; it is the tiny movement that prevents sharpness. The longer the focal length, the higher the sensor resolution, and the smaller the time window for correct technique, the less forgiving the system becomes. In practice, it is therefore not about the one perfect, razor-sharp image, but about yield: How many images in a sequence are truly usable, how reproducible is the result, and how quickly are you ready when the subject appears only briefly?
Read more

Experiences
Florida’s winter is peak season for bird photography. In the Everglades, Lake Apopka, the Ding Darling Reserve and Crystal River, migratory birds meet resident species. Herons, pelicans and ibises shape the wetlands—at the center is the osprey. This article shows why Florida is one of the best winter destinations for wildlife photography and how light, landscape and biodiversity work together.
Read more
Sign up for my newsletter now and be the first to receive exclusive insights, tips, and new dates.